*swoon*
A recent post over at my friend,
Bride-on-Purpose, got me fantasizing about ring pillows. Such a silly thing for me to think about as we probably won't have a cute little fella to do us the honor. (We have a family friend with a baby boy we
adore but he will only be 2 at our wedding, and My Guy's godson will only be 2.5...I have a slew of the cutest little cousins in the world but I don't know if they can make it). So...until we know the details I'll just not think about logistics, and simply post the stuff that makes me smile.

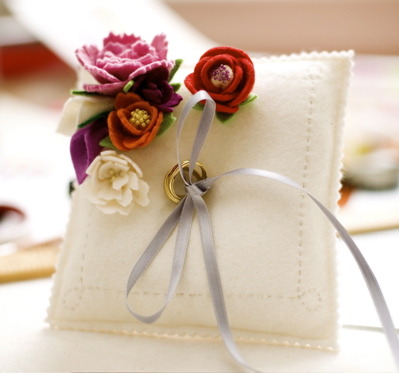

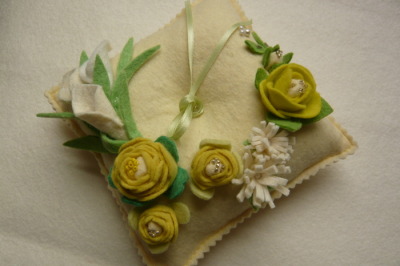
I love that first little green pillow by
LLubav. I actually appreciate
everything this designer crafts out of felt (pretty pins, flowers... check her out). Beautiful stuff. But pricey. And since I'm all about trying to be crafty these days, I'm throwing out these ideas just in case I might be tempted to pick up some felt and make one myself (or attempt to make one anyway.)

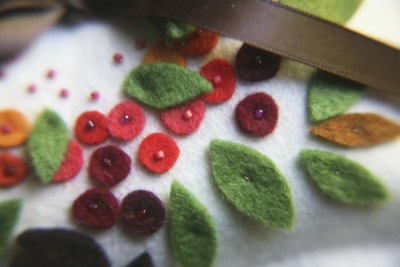
So. I found this pretty picture over at
BlissTree. I think it has a similar look to the flowers on the pillows I admire. She provided a link to
Creature Comforts tutorial about making these flowers out of paper (simply substitute with felt.)

How to:
1. Draw a spiral on a 4x4" square sheet of paper
2. Cut out spiral along the lines you have drawn
3. Begin rolling up the spiral from the outside
4. Keep on rolling until there is no more left to roll
5. You're done.
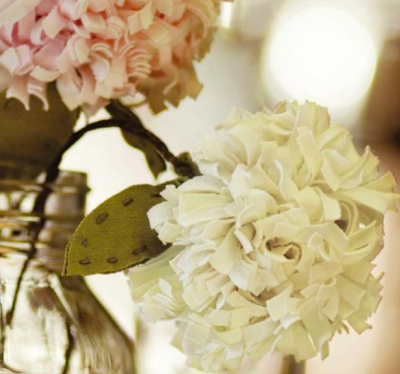
And then I saw these mums, which I find to be equally intriguing from
Elizabeth Anne Designs. It's made out of an old t-shirt...too cool. She sent me over to
The Fabric Of Our Lives for a tutorial.
Ingredients:
- Plain, white cotton tee shirt
- Scissors
- Stapler
- Finger paint (or tempra paint and brush) in Valentine's colors
- Cotton balls
Instructions:
(see post for complete stuff)
1. Cut Mum Strips
For each small mum, you’ll need two cut strips of cotton jersey (see the dimensions at right), or a total of the sixty strips to make six large mums.
Using your garment scissors, cut sixty strips of cotton jersey in different colors, each 1 ½” x 20”. Switching to your embroidery scissors, cut slits about ¼” apart along each strip, stopping ½” from the bottom edge.

2. Roll Pair of Mum Strips and Stitch
Select two of the fabric strips you cut in Step 1, align their edges, and roll them together along their uncut edge.

Thread your needle, “love” your thread, and knot off. Secure the uncut, rolled bottom edges of the two strips making up a small mum by stitching through all layers several times to join them. Repeat the process to create four more small mums.
3. Make Floral-Wire Stems
Make a stem for each large mum by cutting a piece of floral wire to your desired length and twisting a loop in one end of the wire by rolling the wire around your finger.
4. Attach Small Mums to Stems
Attach the five small mums to each stem by sewing them through and around the stem’s loop.
5. Cut Flat Leaves
Fold the green cotton-jersey fabric in half. Using your garment scissors and the Flat Leaf pattern below; cut out the leaf pattern to get two flat leaves to make one finished leaf. Repeat to make additional leaves for each mum.

6. Stitch Flat Leaves
Align each pair of cut flat leaves, with the wrong sides of the fabric together, and pin them in place. Thread your needle, love your thread, and stitch around the leaf ¼” away from the cut edges, using a straight stitch to join the two layers.
7. Attach Leaves to Each Mum
Sew one or two finished flat leaves to each completed mum where the stem and flower meet.

Perfectly pretty for a pillow.


